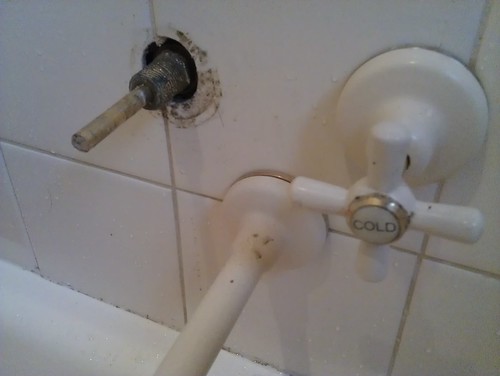
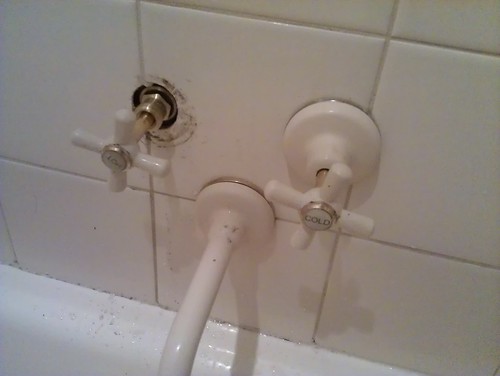
I thought I’d be clever and change all the washers in the bath, and show the kids how it’s done at the same time. The shower ones were okay, but when we tried to take off the bath hot, it broke away.
Result: nothing to grip onto. I assume the whole bit will have to be replaced, but how do I get it out, given the only thing I can grip onto just broke off? There is a hexagonal section, but it’s beyond the level of the tiles, and inaccessible, at least with any spanner I own.
Ideas welcome!
5:20pm: Have got the hexagonal bit that can grip onto it, but it’s not budging. Have called for reinforcements.
Also got a replacement part, which may or may not match the other one precisely, though functionally I expect it to work — as the lady in Bunnings said, “they’re pretty much universal.”
6:50pm: Reinforcements (my highly talented brother-in-law Adrian) arrived, and with the aid of a longer lever than is supplied with the hexagonal sockets, managed to get the thingo out. We’ve replaced it with the new one, which as expected doesn’t quite match the old one; the thread where the cover thingy is meant to go doesn’t match… but it’ll do the job.
Adrian also noted that it’s better when changing a washer to use the hexagonal socket at the base of the shaft thingy rather than a conventional spanner at the top; less risk of breakage.
If you don’t have a highly talented brother-in-law called Adrian to help you with plumbing and other household mishaps, I highly recommend getting one. A highly-talented step-father called Peter would also be able to do the job… but mine is in America at the moment.
Also thanks to Dean from the Twittersphere, for the tip on getting the hexagonal sockets. (Three cheers for the #LazyWeb!)
PS. Adrian also told me something I’ve believed for ages: don’t tighten a tap too much. Tighten it just enough to stop the water. Beyond that is bad for the washer; it’ll just wear it out quicker.


12 replies on “Plumbing mishap”
You might have to bite the bullet and chip away the edges of the tile to reach the hexagonal part – assuming pointy nosed pliers will reach – the tap handle will cover the larger hole, judging by the dark ring.
Otherwise you’ll have to break the tile (carefully) and replace it after you’ve fixed the tap.
Cheaper than calling out a plumber.
I’m no expert, but you need to get it off from the hexagonal piece I believe – you’re going to need some funky grippers from Bunnings, or better yet, your local hardware store (if they have them – unlikely).
It’s always the hot water side that causes problems, because the heat accelerates corrosion and all the other processes that eventually make valve replacements such “Fun.”
So part of the valve stem broke when you were removing the handle? There’s a special tool to make this less likely, though I use a rust-penetrating freeing agent (up here we call it “Liquid Wrench,” but if that can’t be had, WD-40) and a few light taps with a hammer.
But I see that we’re past that here.
Good news! You get to have a new faucet. Better news! You get to buy at least one new tool, though I doubt it’s very expensive. The one thing it appears that you’ll definitely need is a “stem wrench.” I’ll give you a couple of good links on this and wish you the best.
This page has less detail about the process, but the cross-section of the valve can give you a great idea of what goes where and what comes off first:
http://kitchen-bathroom-faucets.blogspot.com/2009/04/how-to-repair-leaking-bathtub-faucet.html
This next page gives much better visual instructions for the whole process, including showing you how to use the stem wrench. It also implies that you need a large quantity of specialized tools, but with any luck you can stop at the stem wrench. If you aren’t so lucky, the existing valve seat will have to be removed and replaced, and that’s another tool.
I so wish I could be there so I could try VB and offer “helpful suggestions.” Good luck!
Uh-oh. I just spent half an hour writing a lengthy and informative response, and for some reason it vanished into the aether when I hit “submit.”
Here are a couple of US-centric web sites that I wish I had when I tried to fix the same problem. The first link isn’t very informative, but it has a nifty cross-section view of the whole valve, which would have saved me a lot of effort trying to imagine what I was working on. The second link guides you through the process with some useful advice and pictures, but you might have to ignore its assumption that you need a pouch full of specialized tools. With luck, you need only the stem wrench. With slightly worse luck, you’ll also need the valve seat tool.
Link the first:
http://kitchen-bathroom-faucets.blogspot.com/2009/04/how-to-repair-leaking-bathtub-faucet.html
Link the second:
http://www.masterplumber.net/gerber/gerber.htm
Good luck!
Looks like you’re up that well known waterway without any propulsion device. The only way out I can see is to get a hacksaw, cut off the long bit that’s sticking out, then use your hexagontal tool to remove the hexagontal piece. You’ll have to then replace the bit that you’ve hacked through. There is a plumbing supplier on Bridge Road that might sell one, failing that they might be able to tell you where to get one. Failing that, give Thomas a ring. He can fix anything.
I have those exact same taps in my laundry and cannot get them off. Next time I get a plumber in, I’m going to get them to change the washers for me. In the meantime, I catch the drips in a bucket for the plants.
Good old fashioned monkey wrench (also called a pipe wrench) should have done the trick. If you don’t one in your toolbox, get one. Word of warning put a towel or something underneath. If you drop the heavy wrench it will likely chip enamel or tile.
I used to call them tube spanners. They are just a metal tube with the socket at the end of it. Very simple and very cheap. If there is a good seat, ceramic discs seem to last longer than any normal washer.
you need a spanner which is like a tube about 170 mm long and 25 mm wide which is hexagonal at the end.
I see Daniel that you have a few other American commenters on here. I can tell from their spelling and the use of the word “faucet” which is what we call a tap in the US. Strangely enough we commonly call what comes out of a faucet “tap water”. I have never heard someone call it “faucet water”. An outside tap is sometimes called a “spigot” (sounds like spick- it) in some pars of the US.
After living in and repairing taps/faucets in both counties I can tell you that the design of taps and washers in Australia are quite different. The Australian design seems universal with generally 1 type of washer whereas in the US each faucet manufacturer (there are many) has their own design and there are so many sizes of washers and different faucet parts that you almost always have to take the broken faucet parts or worn washer to the hardware store with you to find the exact replacement. In the US the washer that fits in a tub or shower faucet is usually quite a bit larger than a washer for a sink faucet whereas in Australia they seem to be interchangeable.
Single lever faucets for tubs and sinks became popular as far back as the 60’s and many if not most homes will have them. Moen and Delta are the most popular brands. Delta commonly uses a ball valve while Moen uses a slender cartridge design. I prefer the Moen faucets.
If you can’t find a new escutchion (sp?) cover for the hole in the tile and valve you will want to caulk the opening to keep water from getting in the opening and causing a lot of damage in the wall behind the tile.
what you will find, daniel, is that the new tap you bought is 5 mm shorter than the old one. Which means that the wide white cone-shaped piece which you have on your cold tap in the second photo, won’t go back on.
Daniel
You’re lucky. When you get to my age “plumbing mishap” means something a lot more embarrassing (and expensive to fix).